以太坊设计与实现
title: "以太坊Ethash算法实现" menuTitle: "Ethash算法实现" date: 2019-08-18T10:11:46+08:00 weight: 20303 description: "源代码讲解以太坊PoW共识算法Ethash的实现"
上一篇文章中,我已经介绍了以太坊Ethash算法的[基础知识]({{<ref "ethash.md" >}}), 这篇文章主要讲解以太坊PoW共识算法 Ethash 的算法实现,此算法是以太坊PoW共识算法的核心内容。
配置Ethash算法参数
算法中围绕如何确定缓存大小、数据集大小、如何进行数据计算。定义了一系列算法参数。 代码集中在 consensus/ethash/algorithm.go:37 中。
| 常量 | 值 | 说明 |
|---|---|---|
| datasetInitBytes | 1 << 30 | 创世时的数据集大小,1GB |
| datasetGrowthBytes | 1 << 23 | 每个时期的数据集增长量,8MB (0.7%) |
| cacheInitBytes | 1 << 24 | 创世时的缓存大小,16MB |
| cacheGrowthBytes | 1 << 17 | 每个时期的缓存增长量,128KB (0.78125%) |
| epochLength | 30000 | 每个时期区块数 |
| mixBytes | 128 | 最小数据宽带,使用128字节的顺序访问,以便每轮算法总是从RAM中获取一整页,从而最小化ASIC在理论上能够避免的转换后备缓冲器未命中。 |
| hashBytes | 64 | 一个哈希值长度 |
| hashWords | 16 | 一个哈希值中32个字节的数量,64*8/32=16 |
| datasetParents | 256 | 每个数据集的父项数,在DAG数据中使用 |
| cacheRounds | 3 | 缓存生产中的回合数 |
| loopAccesses | 64 | hashimoto 算法中循环调用次数 |
根据常量设定,定义了两个方法,用于计算出实际的缓存大小和数据集大小。
根据区块高度,可计算验证区块所需要的缓存大小。
// consensus/ethash/algorithm.go:53
func cacheSize(block uint64) uint64 {
    epoch := int(block / epochLength)//❷
    if epoch < maxEpoch {
        return cacheSizes[epoch]//❶
    }
    return calcCacheSize(epoch)
}

func calcCacheSize(epoch int) uint64 {
    size := cacheInitBytes +
            cacheGrowthBytes*uint64(epoch) - hashBytes//❸

    for !new(big.Int).SetUint64(size / hashBytes).ProbablyPrime(1) { //❹
        size -= 2 * hashBytes
    }
    return size
}
为了加速计算速度,已经根据增长算法,内置了最早 1024 个时期的缓存大小❶。相当于在 30720000 区块前是可以直接使用缓存的。 否则根据区块所在时期❷,进行缓存大小计算。 算法简明,根据基础量和增长量计算出缓存大小❸,但不能直接使用这个阀值,而是采用低于阀值的一个素数❹,是为了帮助降低循环行为的偶然规律性的风险。
类似的,同样的方式提供了计算数据集大小的方法。
// consensus/ethash/algorithm.go:74
func datasetSize(block uint64) uint64 {
    epoch := int(block / epochLength)
    if epoch < maxEpoch {
        return datasetSizes[epoch]
    }
    return calcDatasetSize(epoch)
}

func calcDatasetSize(epoch int) uint64 {
    size := datasetInitBytes + datasetGrowthBytes*uint64(epoch) - mixBytes
    for !new(big.Int).SetUint64(size / mixBytes).ProbablyPrime(1) {
        size -= 2 * mixBytes
    }
    return size
}
还需要定义一个 seed 方法,用于计算出区块的种子值。
func seedHash(block uint64) []byte {
    seed := make([]byte, 32)
    if block < epochLength {
        return seed
    }
    keccak256 := makeHasher(sha3.NewLegacyKeccak256())
    for i := 0; i < int(block/epochLength); i++ {
        keccak256(seed, seed)
    }
    return seed
}
区块种子值,在每个周期是保持不变的。通过多次叠加哈希计算,得到一个 32 位值作为区块种子。
生成缓存
根据已计算出的缓存大小、区块周期、种子,则可以生成伪随机填充的缓存数据,代码实现在 generateCache 函数中。
// consensus/ethash/algorithm.go:139
func generateCache(dest []uint32, epoch uint64, seed []byte) {
    // ...
    header := *(*reflect.SliceHeader)(unsafe.Pointer(&dest))//❶
    header.Len *= 4
    header.Cap *= 4
    cache := *(*[]byte)(unsafe.Pointer(&header))

    // ...
    size := uint64(len(cache))
    rows := int(size) / hashBytes
    // ...
    keccak512 := makeHasher(sha3.NewLegacyKeccak512())
    keccak512(cache, seed)//❷
    for offset := uint64(hashBytes); offset < size; offset += hashBytes {//❸
        keccak512(cache[offset:], cache[offset-hashBytes:offset])
        atomic.AddUint32(&progress, 1)
    }
    temp := make([]byte, hashBytes)

    for i := 0; i < cacheRounds; i++ {//❹
        for j := 0; j < rows; j++ {
            var (
                srcOff = ((j - 1 + rows) % rows) * hashBytes
                dstOff = j * hashBytes
                xorOff = (binary.LittleEndian.Uint32(cache[dstOff:]) % uint32(rows)) * hashBytes
            )
            bitutil.XORBytes(temp, cache[srcOff:srcOff+hashBytes], cache[xorOff:xorOff+hashBytes])
            keccak512(cache[dstOff:], temp)

            atomic.AddUint32(&progress, 1)
        }
    }
    if !isLittleEndian() {//❺
        swap(cache)
    }
}
缓存生产过程,首先将切片大小放大4倍(调用前外部有缩小四倍),以便在内存中填充出一块内存❶。 比如第一个周期内是填充出 16MB 内存。然后,将种子的哈希作为初始化值写入缓存的前64字节中❷, 随后,以一个哈希值长度(64字节)为单位,依次进行哈希,将内容填充到缓存中,完成缓存内容的顺序填充。
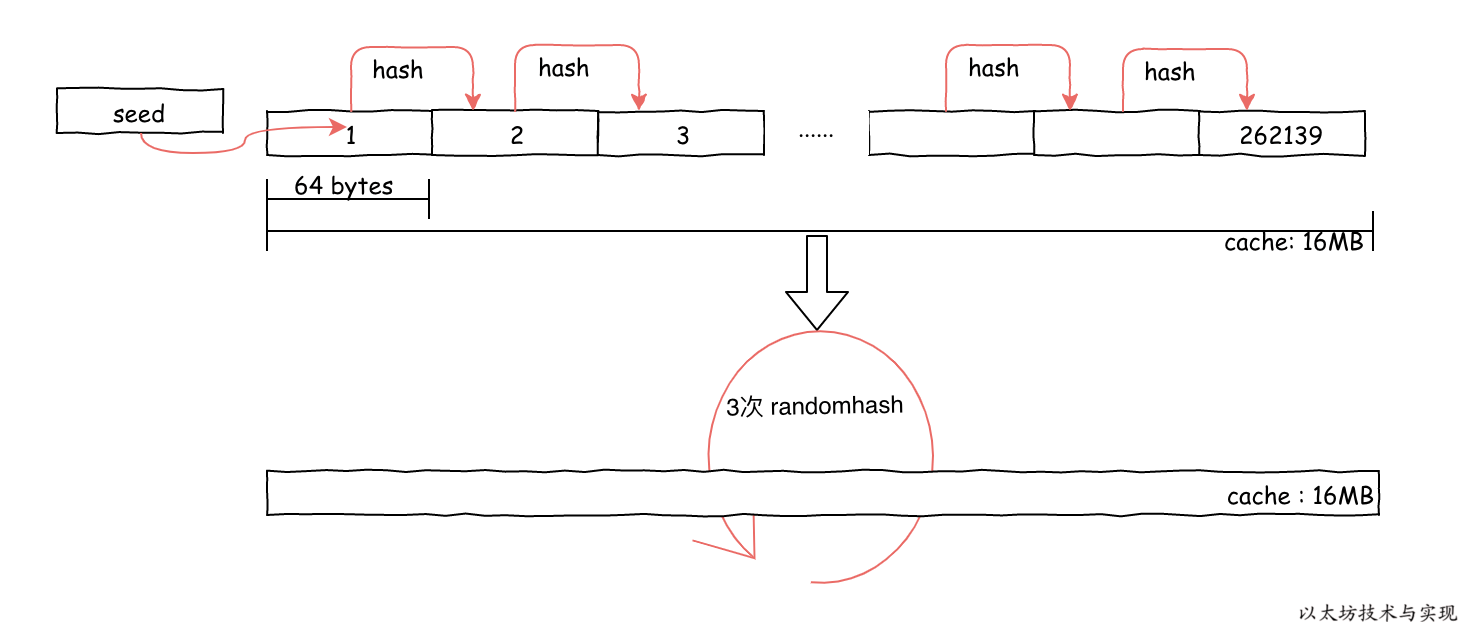
因为所有的计算都是不断进行哈希运算,因此不管在前面确认缓存大小,还是在缓存生成时都是以一个哈希值作为最新计算值。 在计算缓存大小时,已经是根据哈希值长度进行缓存大小计算,所以缓存能被 64 整除,且整除值为一个素数。
接下来,执行了3次(cacheRounds)在严格内存硬哈希函数 Strict Memory Hard Hashing Functions (2014)[^memohash] 中定义的内存难题算法 RandMemoHash ❹,算法描述请参考论文。该生成算法的目的是为了证明这一刻确实使用了指定量的内存进行计算。
最后,如果操作系统是 Big-Endian(非little-endian)的字节序,那么意味着低位字节排放在内存的高端,高位字节排放在内存的低端。此时,将缓存内容进行倒排,以便调整内存存放顺序。最终使得,缓存内容在内存中排序顺序和机器字节顺序一致(为什么要这样做呢?嗯....我也不清楚)。
生成数据集
有了缓存,便可以来生成数据集。生成过程中不断重复从缓存中合成64字节的数据依次填充到数据中。
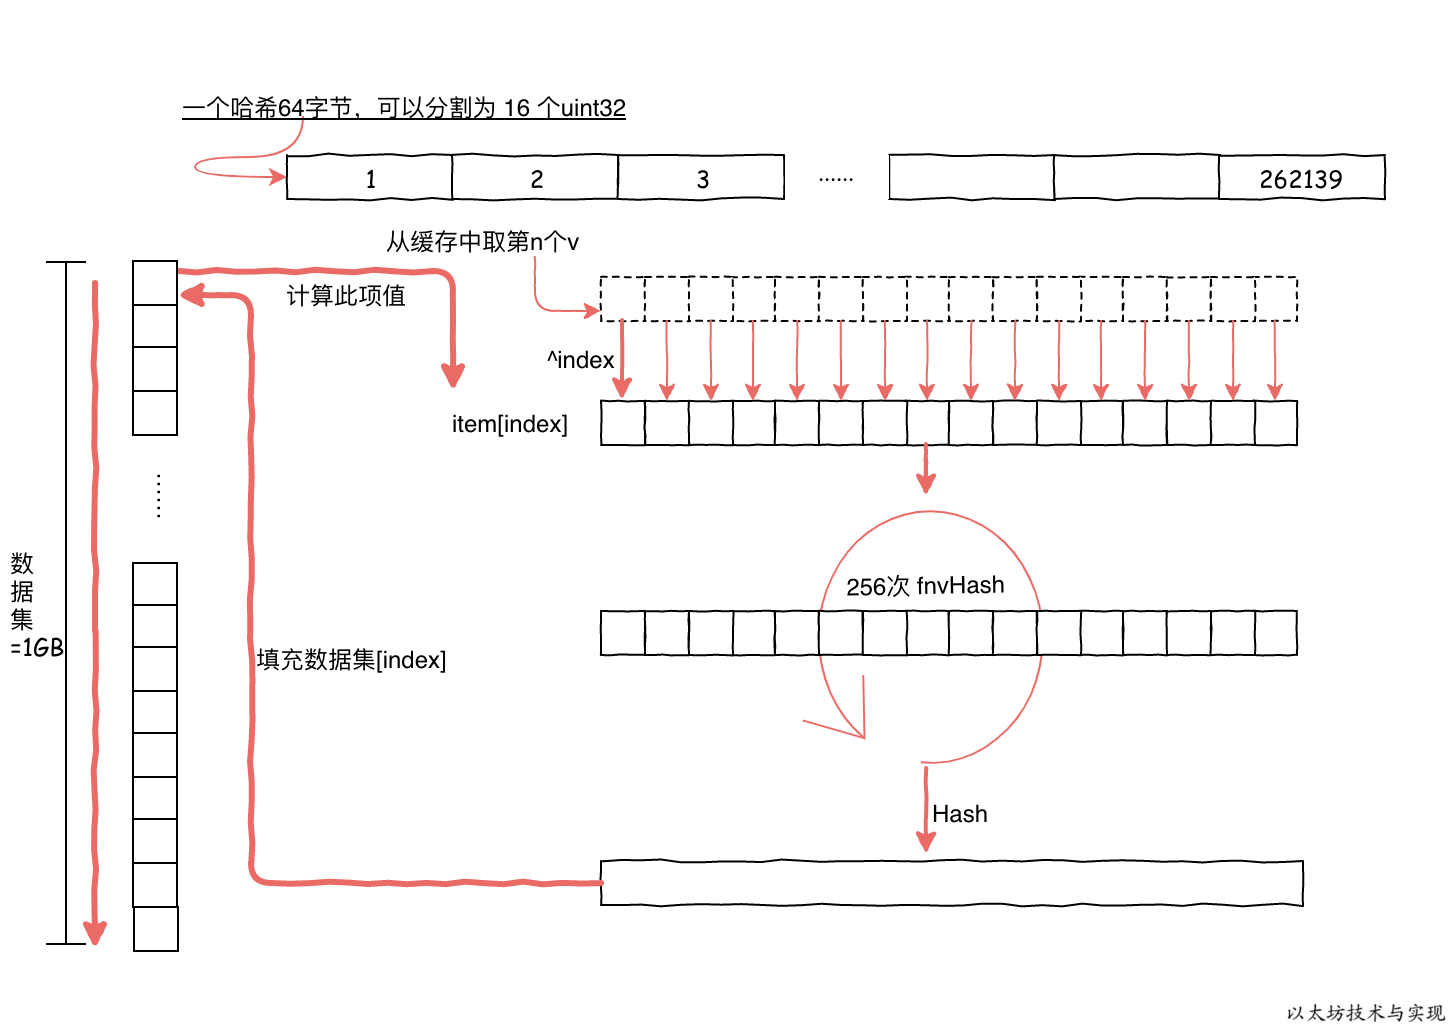
1GB的数据集,则需要填充 16777216 次,每次都是根据索引 index 从缓存中获取 64 字节数据作为初始值,并进行依次哈希计算。
随后,哈希后的 64 字节数据还需要执行 256 次 fnvHash 计算。 最终对计算结果进行哈希,得到最终需要的 64 位字节。 并填充到数据集中。
这样,1 GB数据需要进行 16777216 * 256 次计算。因此此过程还是非常耗时的,因此在 geth 中是重复利用多核进行并行计算。即使如此,1 GB数据集运行也是缓慢的。
这也就是为什么在搭建私有链时,刚开始时会看到一段“Generating DAG in progress” 的日志,直到生成数据集完成后,才可以开始挖矿。
可以执行 geth 的子命令dgeth makedag 10000 /tmp/ethdag来直接生成数据集。
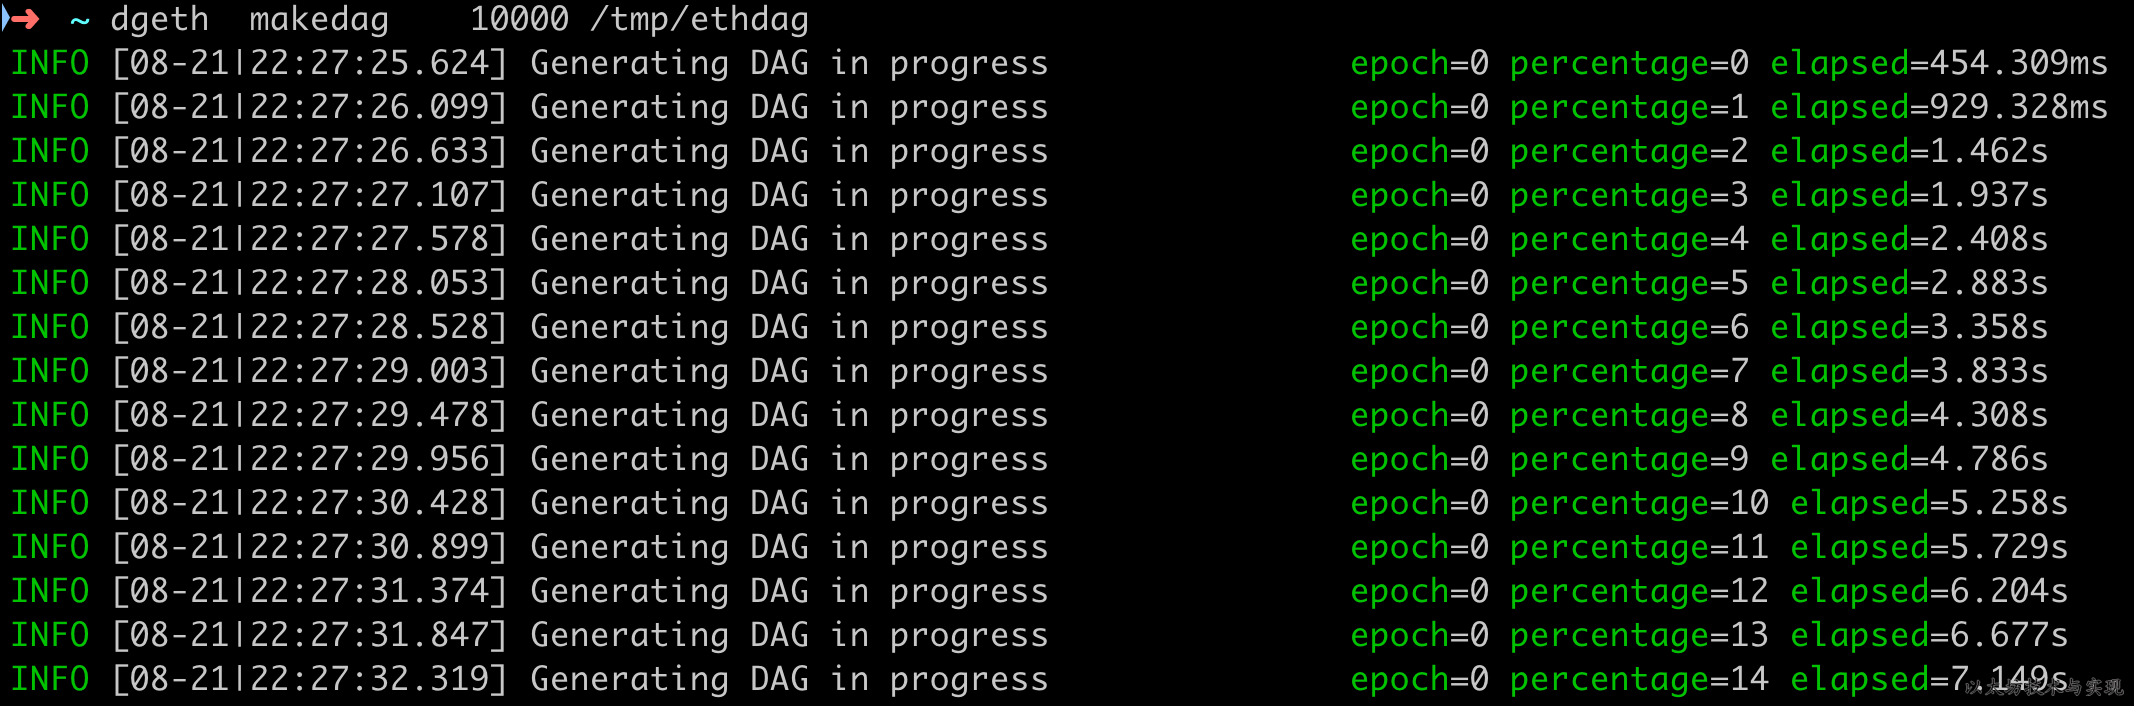
生成完毕后,文件夹 /tmp/ethdag 将大约有 1 GB 。下面是具体的算法实现,这里不展开代码讲解,因为是算法和 Go 语言的字节切片操作的混合体。
func generateDataset(dest []uint32, epoch uint64, cache []uint32) {
    //...
    header := *(*reflect.SliceHeader)(unsafe.Pointer(&dest))
    header.Len *= 4
    header.Cap *= 4
    dataset := *(*[]byte)(unsafe.Pointer(&header))
    //...
    threads := runtime.NumCPU()
    size := uint64(len(dataset))

    var pend sync.WaitGroup
    pend.Add(threads)

    var progress uint32
    for i := 0; i < threads; i++ {
        go func(id int) {
            defer pend.Done()

            keccak512 := makeHasher(sha3.NewLegacyKeccak512())
            batch := uint32((size + hashBytes*uint64(threads) - 1) / (hashBytes * uint64(threads)))
            first := uint32(id) * batch
            limit := first + batch
            if limit > uint32(size/hashBytes) {
                limit = uint32(size / hashBytes)
            }

            percent := uint32(size / hashBytes / 100)
            for index := first; index < limit; index++ {
                item := generateDatasetItem(cache, index, keccak512)
                if swapped {
                    swap(item)
                }
                copy(dataset[index*hashBytes:], item)
                //...
            }
        }(i)
    }
    pend.Wait()
}

func generateDatasetItem(cache []uint32, index uint32, keccak512 hasher) []byte {
    rows := uint32(len(cache) / hashWords)
    mix := make([]byte, hashBytes)

    binary.LittleEndian.PutUint32(mix, cache[(index%rows)*hashWords]^index)
    for i := 1; i < hashWords; i++ {
        binary.LittleEndian.PutUint32(mix[i*4:], cache[(index%rows)*hashWords+uint32(i)])
    }
    keccak512(mix, mix)

    intMix := make([]uint32, hashWords)
    for i := 0; i < len(intMix); i++ {
        intMix[i] = binary.LittleEndian.Uint32(mix[i*4:])
    }
    for i := uint32(0); i < datasetParents; i++ {
        parent := fnv(index^i, intMix[i%16]) % rows
        fnvHash(intMix, cache[parent*hashWords:])
    }
    for i, val := range intMix {
        binary.LittleEndian.PutUint32(mix[i*4:], val)
    }
    keccak512(mix, mix)
    return mix
}
如果上面代码理不清,可以先看 Ethash 算法的伪代码描述:
def calc_dataset_item(cache, i):
    n = len(cache)
    r = HASH_BYTES // WORD_BYTES
    # initialize the mix
    mix = copy.copy(cache[i % n])
    mix[0] ^= i
    mix = sha3_512(mix)
    # fnv it with a lot of random cache nodes based on i
    for j in range(DATASET_PARENTS):
        cache_index = fnv(i ^ j, mix[j % r])
        mix = map(fnv, mix, cache[cache_index % n])
    return sha3_512(mix)

def calc_dataset(full_size, cache):
    return [calc_dataset_item(cache, i) for i in range(full_size // HASH_BYTES)]
PoW计算
挖矿所需具备的数据集准备好后,则在每次需要挖出新块时,需要结合新区块链信息、数据集、随机数来进行数据聚合计算, 如果此算法的输出 result 低于目标 target,则nonce有效。
// consensus/ethash/sealer.go:165
digest, result := hashimotoFull(dataset.dataset, hash, nonce)
if new(big.Int).SetBytes(result).Cmp(target) <= 0 {
    // Correct nonce found, create a new header with it
    header = types.CopyHeader(header)
    header.Nonce = types.EncodeNonce(nonce)
    header.MixDigest = common.BytesToHash(digest)
    // Seal and return a block (if still needed)
    select {
    case found <- block.WithSeal(header):
        logger.Trace("Ethash nonce found and reported", "attempts", nonce-seed, "nonce", nonce)
    case <-abort:
        logger.Trace("Ethash nonce found but discarded", "attempts", nonce-seed, "nonce", nonce)
    }
    break search
}
nonce++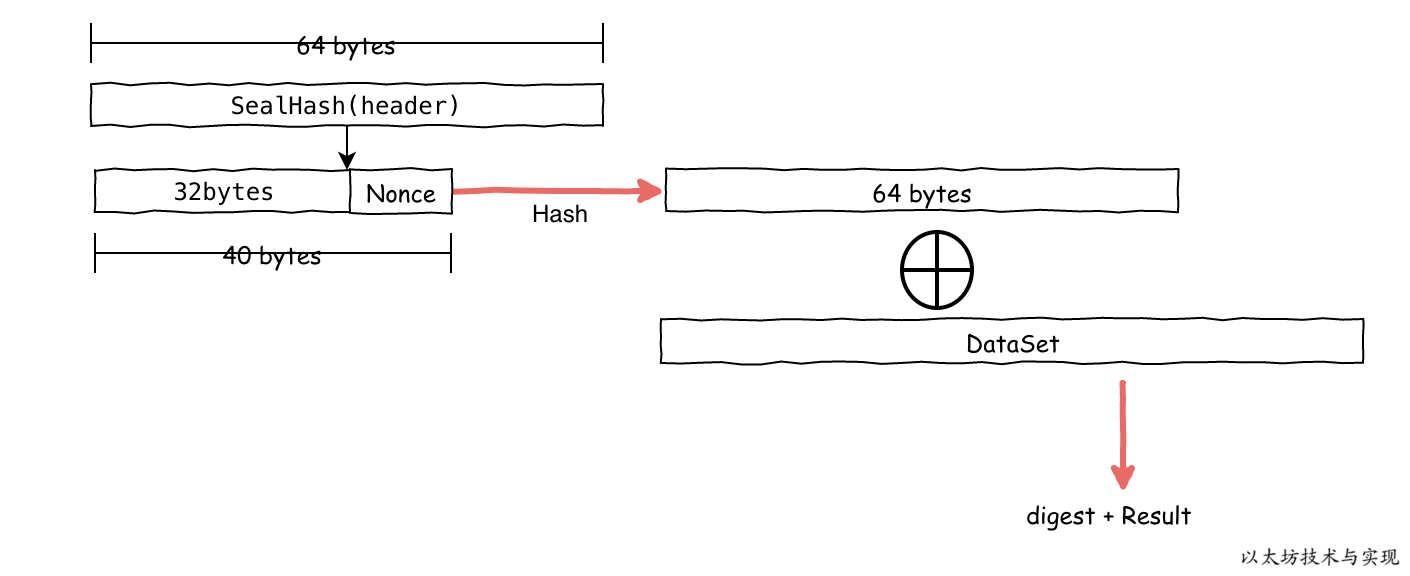
上图是一个大概的计算过程,具体算法也不太清楚设计方式。从 Ethash 算法介绍文档中有说明是在进行数据聚合计算时, 是在内存中使用一个 128字节宽的“混合”,从整个数据集中重复顺序获取128个字节,并使用fnv函数将其与“混合”组合。 使用128字节的顺序访问,可使得每轮算法总是从内存中获取一整页,从而最小化ASIC在理论上能够避免的转换后备缓冲器未命中。
// consensus/ethash/algorithm.go:334
func hashimoto(hash []byte, nonce uint64, size uint64, lookup func(index uint32) []uint32) ([]byte, []byte) {
    // Calculate the number of theoretical rows (we use one buffer nonetheless)
    rows := uint32(size / mixBytes)

    // Combine header+nonce into a 64 byte seed
    seed := make([]byte, 40)
    copy(seed, hash)
    binary.LittleEndian.PutUint64(seed[32:], nonce)

    seed = crypto.Keccak512(seed)
    seedHead := binary.LittleEndian.Uint32(seed)

    // Start the mix with replicated seed
    mix := make([]uint32, mixBytes/4)
    for i := 0; i < len(mix); i++ {
        mix[i] = binary.LittleEndian.Uint32(seed[i%16*4:])
    }
    // Mix in random dataset nodes
    temp := make([]uint32, len(mix))

    for i := 0; i < loopAccesses; i++ {
        parent := fnv(uint32(i)^seedHead, mix[i%len(mix)]) % rows
        for j := uint32(0); j < mixBytes/hashBytes; j++ {
            copy(temp[j*hashWords:], lookup(2*parent+j))
        }
        fnvHash(mix, temp)
    }
    // Compress mix
    for i := 0; i < len(mix); i += 4 {
        mix[i/4] = fnv(fnv(fnv(mix[i], mix[i+1]), mix[i+2]), mix[i+3])
    }
    mix = mix[:len(mix)/4]

    digest := make([]byte, common.HashLength)
    for i, val := range mix {
        binary.LittleEndian.PutUint32(digest[i*4:], val)
    }
    return digest, crypto.Keccak256(append(seed, digest...))
}
返回 result 时有进行一次 Keccak256 哈希,这可确保结果中包含 nonce。可用于证明至少完成了少量的工作; 这种快速外部PoW验证可用于防DDoS目的。进行哈希还可以确保 result 是无偏差的56位 BigNumber 。
如果 reulst 符合低于目标值,说明解题成功。此时,便可将找出的 nonce 写入区块头,生成一个合法的新区块。
header = types.CopyHeader(header)
header.Nonce = types.EncodeNonce(nonce)
header.MixDigest = common.BytesToHash(digest)

select {
case found <- block.WithSeal(header):
    logger.Trace("Ethash nonce found and reported", "attempts", nonce-seed, "nonce", nonce)
//...
}
如何校验区块的合法性
当矿工广播区块到网络中后,如何才能校验区块由完成一定工作量呢?
在共识接口中有定义校验Seal方法:VerifySeal。
func (ethash *Ethash) VerifySeal(chain consensus.ChainReader, header *types.Header) error {
    return ethash.verifySeal(chain, header, false)
}

func (ethash *Ethash) verifySeal(chain consensus.ChainReader, header *types.Header, fulldag bool) error {
    //...
    number := header.Number.Uint64()

    var (
        digest []byte
        result []byte
    )
    //...
    if !fulldag {
        cache := ethash.cache(number)

        size := datasetSize(number)
        if ethash.config.PowMode == ModeTest {
            size = 32 * 1024
        }
        digest, result = hashimotoLight(size, cache.cache, ethash.SealHash(header).Bytes(), header.Nonce.Uint64())
        //...
    }
    if !bytes.Equal(header.MixDigest[:], digest) {
        return errInvalidMixDigest
    }
    target := new(big.Int).Div(two256, header.Difficulty)
    if new(big.Int).SetBytes(result).Cmp(target) > 0 {
        return errInvalidPoW
    }
    return nil
}
校验时 fulldag 为false,将采用 hashimotoLight 计算出在指定Nonce下的执行结果 result 和 digest。 根据本地计算结果应该和区块的MixDigest值一致,且 result 低于给定的目标值 target, 则说明Seal校验通过,表明该区块由完成一定量的工作量。
回到 hashimotoLight 方法,此方法是直接利用缓存实时计算出数据线来参与校验。这种方式和 hashimotoFull 类似。 因为数据集也是通过缓存生成,如果没有数据集可以直接使用缓存计算。 这样对于普通节点,只需要利用 16MB 的缓存便可以轻松完成 PoW 校验,按需生成所需要的数据集的数据项。
// consensus/ethash/algorithm.go:386
func hashimotoLight(size uint64, cache []uint32, hash []byte, nonce uint64) ([]byte, []byte) {
    keccak512 := makeHasher(sha3.NewLegacyKeccak512())

    lookup := func(index uint32) []uint32 {
        rawData := generateDatasetItem(cache, index, keccak512)

        data := make([]uint32, len(rawData)/4)
        for i := 0; i < len(data); i++ {
            data[i] = binary.LittleEndian.Uint32(rawData[i*4:])
        }
        return data
    }
    return hashimoto(hash, nonce, size, lookup)
}
至此,已完成了 Ethash 算法的介绍和算法实现。算法细节我没有细说。如果你有疑问,可以加入微信群来一起交流。
[^memohash]: Strict Memory Hard Hashing Functions 是一种不能或难以平行化的哈希算法,使得难以加速内存运算。具体见论文