脚手架用的是vue-cli,vite还不太稳定,很多第三方库也存在兼容问题,为了能正常在实际项目中使用,还是选择了vue-cli。
如果不是最新的脚手架,就需要重新安装一下了:
npm install -g @vue/cli
# OR
yarn global add @vue/cli
创建项目:
vue create vue3-ts-template

// 选择Manually select features

composition-api ([Vue 2] router, vuex, less, babel, eslint)
Default ([Vue 2] babel, eslint)
Default (Vue 3 Preview) ([Vue 3] babel, eslint)
✅ Manually select features然后 Vue 选 3.0, css预处理器,看个人习惯,sass,less,stylus都可以。
创建完项目,把那些不需要的页面例如:helloword删了就行了,有一个shims-vue.d.ts 得留着。
yarn add element-plus

// main.ts

import ElementPlus from 'element-plus';
import 'element-plus/lib/theme-chalk/index.css';

const app = createApp(App);
app.use(ElementPlus);
app.mount('#app');页面内容没什么好说的,想怎么画就怎么画。
<el-form ref="ruleForm" :model="form">
 <el-form-item prop="email" :rules="{required:true, message:'请输入账号', trigger:'change'}">
  <el-input placeholder="请输入账号" v-model="form.email"></el-input>
 </el-form-item>
 <el-form-item prop="pass" :rules="{required:true, message:'请输入密码', trigger:'change'}">
  <el-input type="password" placeholder="请输入密码" v-model="form.pass"></el-input>
 </el-form-item>
 <el-form-item>
  <el-button class="width100" type="primary" @click="onSubmit">登陆</el-button>
 </el-form-item>
</el-form>
说说验证吧!ElementPlus 官方文档里面,还是按照Vue2.x的方式optionsApi写的:
但是我们既然采用了vue3,还是要紧跟时代步伐:
import { defineComponent, toRefs, reactive, ref } from 'vue';
import { useRouter } from 'vue-router';
interface UserForm {
email: string;
pass: string | number;
}
export default defineComponent({
setup () {
const router = useRouter();
const state = reactive({
form: {
email: 'admin',
pass: 'admin123'
} as UserForm,
ruleForm: ref<any>(null)
});
const onSubmit = () => {
// ruleForm.value.validate
state.ruleForm.validate().then((valid: boolean) => {
if (valid) {
if (state.form.email === 'admin') {
router.push({ path: '/' });
}
}
});
};
return {
...toRefs(state),
onSubmit
};
}
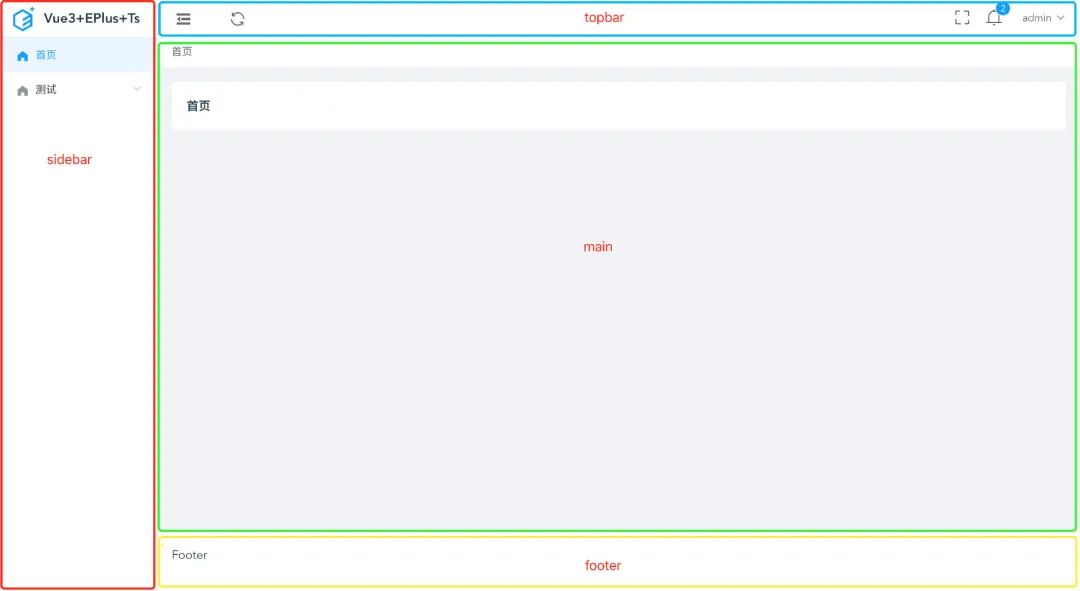
});<el-form ref="ruleForm"> 绑定ruleForm: ref<any>(null) 声明ruleForm,并返回state.ruleForm.validate() 而不是 state.ruleForm.value.validate()<div :class="['wrapper',isCollapse?'hideSidebar':'']">
<el-container>
<el-aside :width="isCollapse?'64px':'210px'">
<sidebar/>
</el-aside>
<el-container>
<el-header height="50px">
<topbar @reload="handleReload"/>
</el-header>
<el-main>
<breadcrumb/>
<div v-if="isRouterAlive">
<app-main/>
</div>
</el-main>
<el-footer>Footer</el-footer>
</el-container>
</el-container>
</div>布局全凭自己喜欢,我这里采用最简单,最常见的布局。这里做了一个刷新主要内容的功能。
setup() {
  const isRouterAlive = ref<boolean>(true);
  const handleReload = () => {
 isRouterAlive.value = false;
 nextTick(() => {
  isRouterAlive.value = true;
 });
  };
  return {handleReload}
}yarn add screenfull
import screenfull, { Screenfull } from 'screenfull';

setup() {
    const change = () => {
   fullscreen.value = (screenfull as Screenfull).isFullscreen;
  };
 // 全屏事件
 const handleFullScreen = () => {
  if (!screenfull.isEnabled) {
   // 如果不允许进入全屏,发出不允许提示
   ElMessage({
    message: '暂不不支持全屏',
    type: 'warning'
   });
   return false;
  }
  screenfull.toggle();
 };
 if (screenfull.isEnabled) {
  screenfull.on('change', change);
 }
}
要引入 Screenfull 这个接口,并做一下类型断言
(screenfull as Screenfull),不这样ts编译通不过。
yarn add axios
import axios, { AxiosResponse, AxiosRequestConfig } from 'axios';
import { ElMessage } from 'element-plus';
const instance = axios.create({
 baseURL: process.env.VUE_APP_API_BASE_URL || '',
 timeout: 120 * 1000,
 withCredentials: true
});

const err = (error) => {
 if (error.message.includes('timeout')) {
  // console.log('error---->',error.config)
  ElMessage({
   message: '请求超时,请刷新网页重试',
   type: 'error'
  });
 }
 if (error.response) {
  const data = error.response.data;
  const token = '';
  if (error.response.status === 403) {
   ElMessage({
    message: 'Forbidden',
    type: 'error'
   });
  }
  if (error.response.status === 401 && !(data.result && data.result.isLogin)) {
   ElMessage({
    message: 'Unauthorized',
    type: 'error'
   });
   if (token) {
    // store.dispatch('Logout').then(() => {
    //  setTimeout(() => {
    //   window.location.reload();
    //  }, 1500);
    // });
   }
  }
 }
 return Promise.reject(error);
};
instance.interceptors.request.use((config: AxiosRequestConfig) => {
 return config;
}, err);

instance.interceptors.response.use((response: AxiosResponse) => {
 console.log(response);
 const config: AxiosRequestConfig = response.config || '';

 const code = Number(response.data.status);
 if (code === 200) {
  if (config && config.successNotice) {
   ElMessage({
    message: response.data.msg,
    type: 'success'
   });
  }
  return response.data;
 } else {
  let errCode = [402, 403];
  if (errCode.includes(response.data.code)) {
   ElMessage({
    message: response.data.msg || '没有权限',
    type: 'warning'
   });
   setTimeout(() => {
    window.location.reload();
   }, 500);
  }
 }
}, err);

export default instance;
这个axios二次封装就见仁见智了,看你们的业务和习惯,我只提供一个示例。
挂载到全局:
import axios from '@/utils/request';

app.config.globalProperties.$http = axios;

// 使用

import { getCurrentInstance } from 'vue';
const { ctx } = getCurrentInstance() as any;

ctx.$http(...).then(...)这里需要说明一点的是,如果引入AxiosResponse, AxiosRequestConfig这两个接口来做类型判断。要是在config中定义了一些额外的参数,又要使用就需要定义一个声明文件了。
我在config中定义了successNotice和errorNotice分别来判断请求成功和失败是否需要提示信息,并且它们都是非必填。
// shims.axios.d.ts
import { AxiosRequestConfig } from 'axios';

declare module 'axios' {
  export interface AxiosRequestConfig {
    successNotice? : boolean,
    errorNotice? : boolean
  }
}为了更方便快捷的写业务,可以二次封装一些组件,简化操作。
<template>
<div>
<el-table
border
v-bind="$attrs"
:data="data"
:rowKey="rowKey"
size='small'
:onSelectionChange="handleSelectionChange"
>
<el-table-column v-if="allowSelect" type="selection" width="55"></el-table-column>
<template v-for="item in columns" :key="item.prop">
<el-table-column v-bind="item" v-if="item.slot" >
<template v-slot:header>
<slot :name="item.slot.header">{{item.label || '自定义header'}}</slot>
</template>
<template v-slot:default="scope">
<slot :name="item.slot.body" :data="scope.row">{{scope.row[item.prop] || '需要自定义' }}</slot>
</template>
</el-table-column>
<el-table-column v-else v-bind="item"></el-table-column>
</template>
<slot/>
</el-table>
<HeroPaging
v-if="showPaging"
class="marginT10 text-right"
:pagination="pagination"
@pagingChange="handlePagingChange"/>
</div>
</template>
<script>
import { defineComponent, PropType } from 'vue';
import HeroPaging from '../HeroPaging/index';
export default defineComponent({
components: { HeroPaging },
props: {
// 数据
data: {
type: Array,
default: () => []
},
// 表格项
columns: {
type: Array,
default: () => []
},
// 绑定key
rowKey: {
type: String,
default: 'id'
},
// 分页信息
pagination: {
type: Object,
default: () => {
return {
page: 1,
pageSize: 10,
total: 100
};
}
},
// 是否可选
allowSelect: {
type: Boolean,
default: false
},
// 是否分页
showPaging: {
type: Boolean,
default: true
}
},
setup (props, { emit, slots, attrs }) {
let multipleSelection = [];
const handleSelectionChange = (val) => {
multipleSelection = val;
emit('select', multipleSelection);
};
const handlePagingChange = (option) => {
emit('pagingChange', option);
};
return {
handleSelectionChange,
handlePagingChange
};
}
});
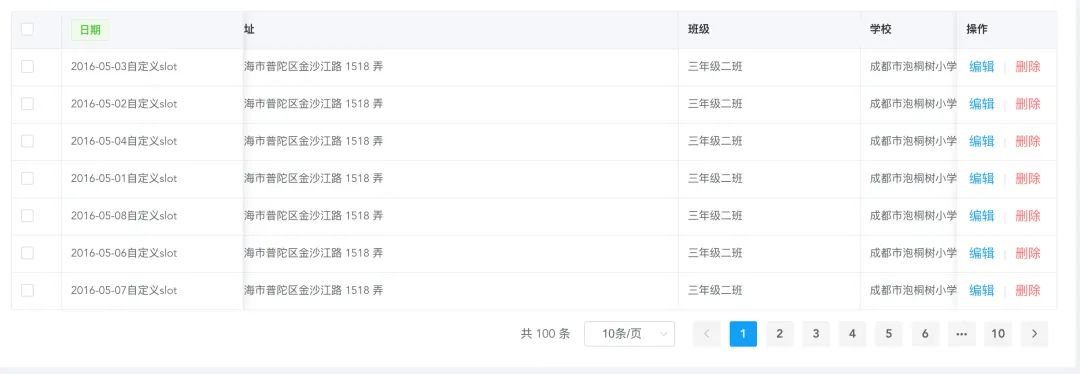
</script>在一些常见的业务场景下,用起来就比较方便了:
<HeroTable
 :allowSelect="true"
 :data="tableData"
 :columns="columns"
 @select="handleSelect"
 @pagingChange="handlePagingChange"
>
 <template v-slot:dateHeader>
  <el-tag type="success">日期</el-tag>
 </template>
 <template v-slot:date="scope" >
  {{scope.data.date}}自定义slot
 </template>
 <template v-slot:action="scope">
  <span class="btn" @click="handleCLick('edit', scope.data)">编辑</span >
  <el-divider direction="vertical"></el-divider>
  <span class="btn red" @click="handleCLick('del', scope.data)">删除</span>
 </template>
</HeroTable>

<script>
const columns = [
 { prop: 'date', label: '日期', fixed: true, width: 200, slot: { body: 'date', header: 'dateHeader' } },
 { prop: 'name', label: '姓名', width: 200 },
 { prop: 'address', label: '地址', width: 500 },
 { prop: 'class', label: '班级', width: 200 },
 { prop: 'school', label: '学校', width: 200 },
 { prop: '', label: '操作', width: 110, slot: { body: 'action' }, fixed: 'right' }
];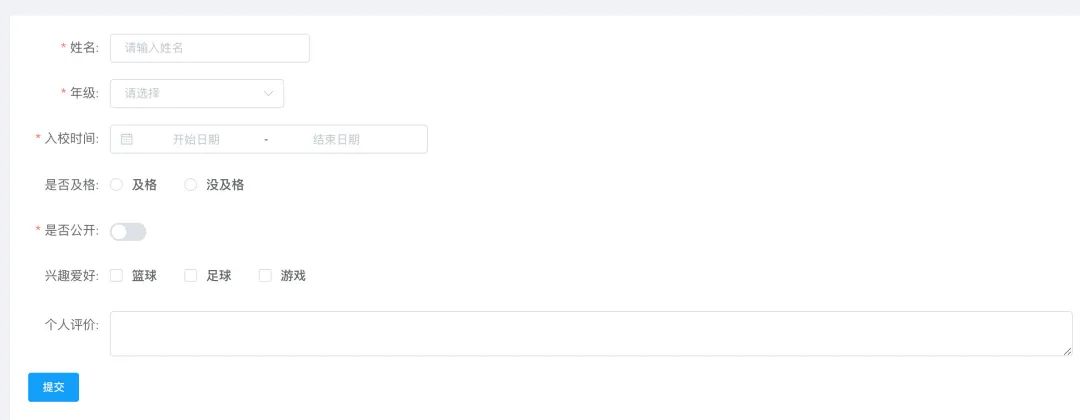
</script><template>
<div>
<el-form ref="formRef" label-suffix=":" :model="form" :label-width="labelWidth">
<el-form-item
v-for="item in formJson"
:key="item.val"
:label="item.label"
:prop="item.val"
:rules="{required: item.require, message:item.errMsg || item.placeholder || item.label + '是必填项', trigger:'change'}"
>
<template v-if="['input','textarea'].includes(item.type)">
<el-input :type="item.type" v-bind="item.other" v-model="form[item.val]" :placeholder="item.placeholder"></el-input>
</template>
<template v-if="item.type === 'select'">
<el-select v-bind="item.other" v-model="form[item.val]" placeholder="">
<el-option
v-for="op in item.options"
:key="op[item.selectVal]"
:label="op[item.selectLabel]"
:value="op[item.selectVal]">
</el-option>
</el-select>
</template>
<template v-if="item.type === 'date'">
<HeroDatePicker v-bind="item.other" v-model="form[item.val]"/>
</template>
<template v-if="item.type === 'radio'">
<el-radio-group v-bind="item.other" v-model="form[item.val]">
<el-radio v-for="op in item.options" :key="op[item.selectVal]" :label="op[item.selectVal]">{{op[item.selectLabel]}}</el-radio>
</el-radio-group>
</template>
<template v-if="item.type === 'checkbox'">
<el-checkbox-group v-bind="item.other" v-model="form[item.val]">
<el-checkbox v-for="op in item.options" :key="op[item.selectVal]" :label="op[item.selectVal]">{{op[item.selectLabel]}}</el-checkbox>
</el-checkbox-group>
</template>
<template v-if="item.type === 'switch'">
<el-switch
v-bind="item.other"
v-model="form[item.val]">
</el-switch>
</template>
</el-form-item>
</el-form>
</div>
</template>
<script>
import { computed, defineComponent, reactive, toRefs, ref, watch, watchEffect } from 'vue';
import HeroDatePicker from '@/components/HeroDatePicker/index';
export default defineComponent({
components: { HeroDatePicker },
props: {
labelWidth: {
type: String,
default: '90px'
},
formJson: {
type: Array,
default: () => []
},
modelValue: {
type: Object,
default: () => ({})
}
},
setup (props, { emit }) {
const formRef = ref(null);
const state = reactive({
form: computed(() => props.modelValue)
});
watch(() => state.form, (val) => {
emit('update:modelValue', val);
}, { deep: true });
const validate = () => {
return new Promise((resolve, reject) => {
formRef.value.validate().then((valid) => {
resolve(valid);
}).catch(err => { reject(err); });
});
};
return {
...toRefs(state),
validate,
formRef
};
}
});
</script><HeroForm ref="formRef" :formJson="formJson" v-model="form"/>
<el-button type="primary" @click="onSubmit">提交</el-button>
steup() {
const formJson = [
{
require: true,
type: 'input',
label: '姓名',
placeholder: '请输入姓名',
val: 'name',
other: { style: 'width:220px' }
},
{
require: true,
type: 'select',
label: '年级',
placeholder: '请选择年级',
val: 'grade',
selectLabel: 'label',
selectVal: 'val',
options: [{ val: 1, label: '一年级' }, { val: 2, label: '二年级' }]
},
....
]
}这里需要提的一点是,自定义组件的v-model实现。
vue2的实现方式:
<ChildComponent v-model="pageTitle" />

// ChildComponent.vue
export default {
  model: {
    prop: 'title',
    event: 'change'
  },
  props: {
    // 这将允许 `value` 属性用于其他用途
    value: String,
    // 使用 `title` 代替 `value` 作为 model 的 prop
    title: {
      type: String,
      default: 'Default title'
    }
  }
}
vue3的实现方式:
<ChildComponent v-model="pageTitle" />

// ChildComponent.vue
export default {
  props: {
    modelValue: String // 以前是`value:String`
  },
  methods: {
    changePageTitle(title) {
      this.$emit('update:modelValue', title) // 以前是 `this.$emit('input', title)`
    }
  }
}
更多具体介绍可前往官网。
DatePicker 为啥要封装一下?因为官方把value-format这个功能取消了(可以看看这个issues),所以每次都要自己去转化一次时间格式,太麻烦。
<!--
format: https://day.js.org/docs/zh-CN/display/format
-->
<template>
  <div>
    <el-date-picker
      v-bind="$attrs"
      v-model="value"
      :type="type"
      start-placeholder="开始日期"
      end-placeholder="结束日期"
      placeholder="选择日期">
    </el-date-picker>
  </div>
</template>

<script>
import { defineComponent, watch, reactive, toRefs } from 'vue';
import dayjs from 'dayjs';
export default defineComponent({
 props: {
  type: {
   type: String,
   default: 'date'
  },
  modelValue: {
   type: [String, Object, Array],
   default: ''
  },
  valueFormat: {
   type: String,
   default: 'YYYY-MM-DD'
  }
 },
 setup (props, { emit }) {
  const state = reactive({
   value: props.modelValue || ''
  });
  watch(() => state.value, (val) => {
   let formatVal = null;
   if (Array.isArray(val)) {
    formatVal = [dayjs(val[0]).format(props.valueFormat), dayjs(val[1]).format(props.valueFormat)];
   } else {
    formatVal = dayjs(val).format(props.valueFormat);
   }
   console.log(formatVal);
   emit('update:modelValue', formatVal);
  });
  return {
   ...toRefs(state)
  };
 }
});
</script>
elemment-plus已经把moment换成了dayjs,我们不需要再安装就可以直接使用。
二次封装呀,我觉得有一点很重要,我们不可能把原来组件的所有props都穷举一遍,所以加上v-bind="$attrs"可以省很多事。
这只是个简单的模板,可以用熟悉一下Vue3 和 Ts,要想在实际开发中使用,还是要慎重。
本文由哈喽比特于2年以前收录,如有侵权请联系我们。
文章来源:https://mp.weixin.qq.com/s/9B6YLjdMDt6zZ7DmmQKUvg
京东创始人刘强东和其妻子章泽天最近成为了互联网舆论关注的焦点。有关他们“移民美国”和在美国购买豪宅的传言在互联网上广泛传播。然而,京东官方通过微博发言人发布的消息澄清了这些传言,称这些言论纯属虚假信息和蓄意捏造。
日前,据博主“@超能数码君老周”爆料,国内三大运营商中国移动、中国电信和中国联通预计将集体采购百万台规模的华为Mate60系列手机。
据报道,荷兰半导体设备公司ASML正看到美国对华遏制政策的负面影响。阿斯麦(ASML)CEO彼得·温宁克在一档电视节目中分享了他对中国大陆问题以及该公司面临的出口管制和保护主义的看法。彼得曾在多个场合表达了他对出口管制以及中荷经济关系的担忧。
今年早些时候,抖音悄然上线了一款名为“青桃”的 App,Slogan 为“看见你的热爱”,根据应用介绍可知,“青桃”是一个属于年轻人的兴趣知识视频平台,由抖音官方出品的中长视频关联版本,整体风格有些类似B站。
日前,威马汽车首席数据官梅松林转发了一份“世界各国地区拥车率排行榜”,同时,他发文表示:中国汽车普及率低于非洲国家尼日利亚,每百户家庭仅17户有车。意大利世界排名第一,每十户中九户有车。
近日,一项新的研究发现,维生素 C 和 E 等抗氧化剂会激活一种机制,刺激癌症肿瘤中新血管的生长,帮助它们生长和扩散。
据媒体援引消息人士报道,苹果公司正在测试使用3D打印技术来生产其智能手表的钢质底盘。消息传出后,3D系统一度大涨超10%,不过截至周三收盘,该股涨幅回落至2%以内。
9月2日,坐拥千万粉丝的网红主播“秀才”账号被封禁,在社交媒体平台上引发热议。平台相关负责人表示,“秀才”账号违反平台相关规定,已封禁。据知情人士透露,秀才近期被举报存在违法行为,这可能是他被封禁的部分原因。据悉,“秀才”年龄39岁,是安徽省亳州市蒙城县人,抖音网红,粉丝数量超1200万。他曾被称为“中老年...
9月3日消息,亚马逊的一些股东,包括持有该公司股票的一家养老基金,日前对亚马逊、其创始人贝索斯和其董事会提起诉讼,指控他们在为 Project Kuiper 卫星星座项目购买发射服务时“违反了信义义务”。
据消息,为推广自家应用,苹果现推出了一个名为“Apps by Apple”的网站,展示了苹果为旗下产品(如 iPhone、iPad、Apple Watch、Mac 和 Apple TV)开发的各种应用程序。
特斯拉本周在美国大幅下调Model S和X售价,引发了该公司一些最坚定支持者的不满。知名特斯拉多头、未来基金(Future Fund)管理合伙人加里·布莱克发帖称,降价是一种“短期麻醉剂”,会让潜在客户等待进一步降价。
据外媒9月2日报道,荷兰半导体设备制造商阿斯麦称,尽管荷兰政府颁布的半导体设备出口管制新规9月正式生效,但该公司已获得在2023年底以前向中国运送受限制芯片制造机器的许可。
近日,根据美国证券交易委员会的文件显示,苹果卫星服务提供商 Globalstar 近期向马斯克旗下的 SpaceX 支付 6400 万美元(约 4.65 亿元人民币)。用于在 2023-2025 年期间,发射卫星,进一步扩展苹果 iPhone 系列的 SOS 卫星服务。
据报道,马斯克旗下社交平台𝕏(推特)日前调整了隐私政策,允许 𝕏 使用用户发布的信息来训练其人工智能(AI)模型。新的隐私政策将于 9 月 29 日生效。新政策规定,𝕏可能会使用所收集到的平台信息和公开可用的信息,来帮助训练 𝕏 的机器学习或人工智能模型。
9月2日,荣耀CEO赵明在采访中谈及华为手机回归时表示,替老同事们高兴,觉得手机行业,由于华为的回归,让竞争充满了更多的可能性和更多的魅力,对行业来说也是件好事。
《自然》30日发表的一篇论文报道了一个名为Swift的人工智能(AI)系统,该系统驾驶无人机的能力可在真实世界中一对一冠军赛里战胜人类对手。
近日,非营利组织纽约真菌学会(NYMS)发出警告,表示亚马逊为代表的电商平台上,充斥着各种AI生成的蘑菇觅食科普书籍,其中存在诸多错误。
社交媒体平台𝕏(原推特)新隐私政策提到:“在您同意的情况下,我们可能出于安全、安保和身份识别目的收集和使用您的生物识别信息。”
2023年德国柏林消费电子展上,各大企业都带来了最新的理念和产品,而高端化、本土化的中国产品正在不断吸引欧洲等国际市场的目光。
罗永浩日前在直播中吐槽苹果即将推出的 iPhone 新品,具体内容为:“以我对我‘子公司’的了解,我认为 iPhone 15 跟 iPhone 14 不会有什么区别的,除了序(列)号变了,这个‘不要脸’的东西,这个‘臭厨子’。